Admin Guide
Document Buckets
New to XDOC is Document Buckets. Document Buckets are an additional way to categorize documents, above Document Categories, that add a can enhance your workflow in several ways, such as:
- Adding another level of document approval to ensure unwanted docs never get sent to an investor or get mixed in with an underwriter's group of approved documents
- Allowing users to easily see a list of deleted documents in a separate bucket if that Bucket is specified
- Allowing uses to see a list of all left side/trash/junk docs stored in their native document type
- Being able to easily move one, or multiple documents from one bucket to the next for enhanced workflow productivity
Identifying the List of Buckets - In the example below you will see the list of defined buckets in dark blue, with the number of documents in that bucket to the right. By default you will always see the "Approved" bucket. The other buckets are configured from the Admin section if you choose to enable them. Admin configuration of Document Buckets will be explained later in this document. 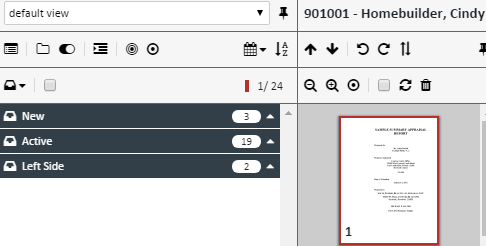
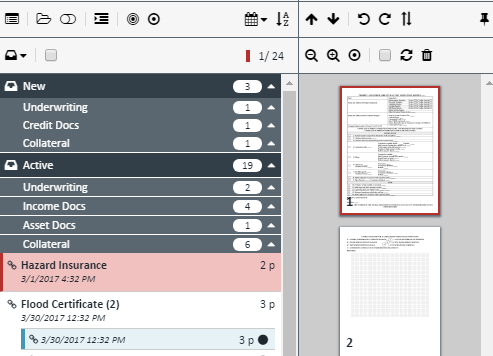
Categories Within Buckets - Within each bucket you will see the categories you have defined. Each bucket will have the complete list of categories in it with the number of documents for each category on the same line as the category name.
Moving Documents between Buckets There are two ways to move documents between categories:
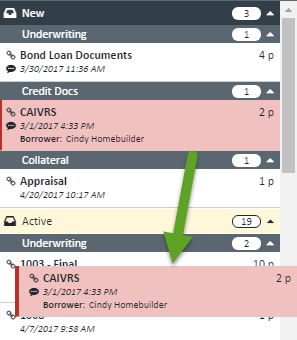
1. Drag method – The drag method works for one or multiple documents. Use Ctrl+Click or Shift+Click to highlight multiple documents. a. Highlight the document(s) in question
b. Drag it to the bucket you want. In this case, the Active bucket. The name of the new Bucket will be highlighted in yellow to indicate it's new location
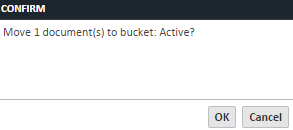
c. You will see a verification dialog. Click OK to move the document or cancel to keep it where it was
2. Toolbar Method – This method works for one or multiple documents. Use Ctrl+Click or Shift+Click to highlight multiple documents. a. Highlight the document(s) in question 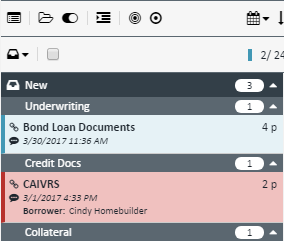
b. Click the bucket icon on the document list toolbar
![]()
c. Select the bucket to move the documents to
d. Click UPDATE
Business Rules Applied to Buckets
1. You can specify up to 9 buckets to meet your business needs. More information can be found in the "Configuring Buckets" section
2. Currently, you can bundle documents only from the Approved bucket. This ensures that investors, etc. will never get documents they don't need to receive
3. Versioning only happens in the Approved bucket. This ensure that the documents to review are more easily seen and moved to other buckets.
4. If you create a "Left Side" or "Junk" bucket, those documents are stored in their native document type. This means that there is no longer a need to create separate document definitions for trash/junk/left side.
Configuring Buckets - To configure Document Buckets:
1. Go to the XDOC Admin section>Projects Tab and click on Project Repository>Document Buckets 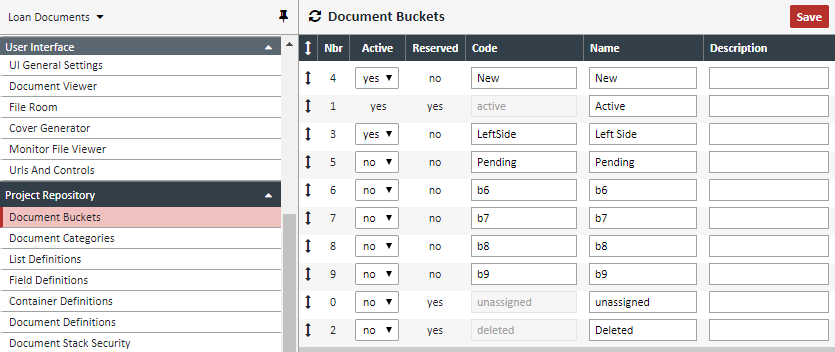
2. You will see there are 3 buckets that are reserved for various processes. The other five buckets can be used at your discretion. The four reserved buckets are:
a. Active (Approved)
b. Deleted (This bucket will not actually house deleted docs yet. It has been reserved for future use)
c. Unassigned
3. Change the "Active" box to "yes" for all buckets you want to use in your workflow
4. You can put the buckets in the order you want by clicking on the  symbol to the left of the "Nbr" field and dragging it to the appropriate position.
5. Once you're finished with putting the buckets in the correct order, Click SAVE 6. Still in the XDOC Admin, Project Tab, go to Project Settings>Project Features
a. Under the Document Bucket Control section choose the bucket that will be used for new documents. That is, when new documents are entered into a loan, they will enter this bucket:
b. Click the Override button for the field
c. From the drop down, choose the bucket for new documents d. Click SAVE