Admin Guide
File Upload Gateways
This function allows you to capture documents coming from a source outside of XDOC, such as a multi-function device (copier/scanner/fax), or any method that can deliver a file to a folder on your network. (e.g. Credit, Appraisal, or Flood vendors, Fax system ). With this method, all files are delivered to a network folder that XDOC checks every 5 seconds to ingest into the system. If you have control over the file naming of these files, they can go directly into the loan and document type with no additional user intervention. For XDOC Cloud customers, contact Customer Support to set up your Gateways.
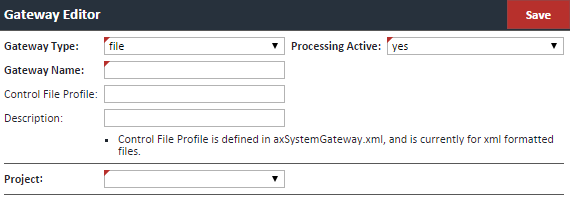
Creating a File Upload Gateway – To add a file upload gateway, follow the instructions below
1. Click CREATE. The Gateway Editor appears

2. Enter the initial information. Required fields are in bold:
| Field | Description |
|---|---|
| Gateway Type | Choose "File". Other options are Email or XML Control, which are only used for very specific purposes |
| Gateway Name | Choose a Name for your Gateway |
| Processing Active | Determines if the Gateway actively processes files. Choose YES |
| Control File Profile | Only used for very specialized MFD's – leave blank |
| Description | Enter an optional description for your gateway |
| Project | Choose the project that you want to create this Gateway for. For almost everyone it will be Loan Documents |
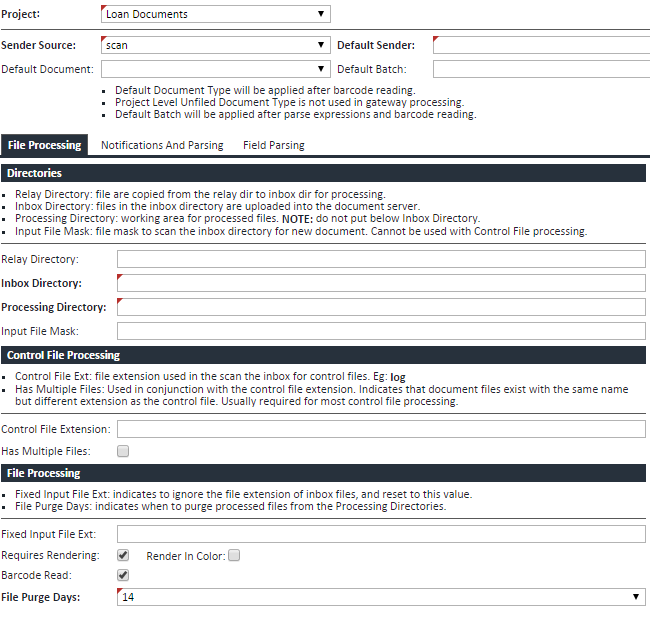
3. Once you choose your project, another input screen will appear  4. Enter the initial information. Required fields are in bold:
| Field | Description |
|---|---|
| Sender Source | Choose the source of the files. This field only controls the icon in the Document Viewer and File Room to indicate the source of the document. |
| Default Document | If all files will be a single document type, choose the document type from the drop down so it will be automatically indexed as such. |
| Default Sender | Defines the identifier of the file in the File Room. |
| Default Batch | If using Batch Processing, assigns all files entering this Gateway to the selected batch. |
| Relay Directory | If your files are coming from an outside source, like a flood or credit vendor, it is advisable to use a relay directory where files will be placed. Enter the path for the relay directory and make sure that the IIS Identity user on the XDOC server has write access to that folder. XDOC routes files from the Relay Directory to the Inbox Directory, described below. |
| Inbox Directory | Local folder or network share to be polled for new files. Files located in this directory are uploaded sent to the processing directory. |
| Processing Directory | Virtual path to the temporary directory where files are moved locally for processing. NOTE: This directory should not be located below the Inbox directory and must be located on the XDOC server. NOTE: You must manually create all directories in order for Gateways to function. |
| Input File Mask | Leave blank. Only for specialized uses. |
| Control File Extension | Leave blank. Only for specialized uses. Extension used in the scan the inbox for control files. E.g.: log |
| Has Multiple Files | Leave blank. Only for specialized uses. Used in conjunction with the control file extension. Indicates that document files exist with the same name but different extension as the control file. Usually required for most control file processing. |
| Fixed Input File Ext | Indicates to ignore the file extension of inbox files, and reset to this value. |
| Requires Rendering | Should always be checked. |
| Render in Color | Will render all files in color. |
| Barcode Read | Enables barcode reading on all files. |
| File Purge Days | Indicates when to purge processed files from the Processing Directories. |
5. When all fields are entered, click SAVE Additional Processing Capabilities for File Upload Gateways File Upload Gateways have a number of other capabilities that allow for notifications and automatic indexing of incoming files. They are:
- Notifications [Notifications and Parsing Tab] – Send a notification to a specified user when files are processed in a gateway. This is very rarely used.
- File Name Parsing [Notifications and Parsing Tab] – XDOC can parse the incoming file name and assign it to a loan and document type. If you have control over the file naming of incoming files, this can be very a beneficial feature.
- Field Parsing [Field Parsing Tab] – Additional file name parsing to assign a field value when indexing to a document (i.e. status, year, etc.)
For more information on using these features, please contact Customer Support.